Dandayamana Janushirasana (Standing Head to Knee Pose): How to Do It Step by Step


Dandayamana Janushirasana (Standing Head to Knee Pose) is a one-legged standing balance in which you hold the lifted foot in your interlaced hands, straighten that leg out in front of you and fold forward until your forehead meets the knee. It is the fifth pose in the Bikram sequence of 26 poses, counting the opening breathing exercise. Most people spend months, often years, on the first step: a straight standing leg.
Pose type: standing balance, forward bend. Level: intermediate, with beginner stages. Props: none, a strap if your hands cannot reach the foot.
What the name means
Four Sanskrit words: dandayamana, standing like a staff, janu, knee, shira (also written sirsa), head, and asana, posture. So: the standing head to knee posture. The seated version, Janu Sirsasana (Head to Knee Pose), is a classic forward bend. The standing form with interlaced fingers under the foot belongs to the Bikram and hot yoga tradition from the 1970s. You will not find it in the old hatha texts.
How to do Standing Head to Knee Pose, step by step
The pose is built in stages. Each stage is a complete pose. Stay in the one where your standing leg stays straight.
- Stand with your feet together and shift your weight into your left foot. Spread the toes and press evenly through the heel and the ball of the foot.
- Straighten the left leg by drawing the kneecap up with the front of the thigh. The quadriceps do the work, the knee joint does not push back. This is what hot yoga teachers mean by "lock the knee".
- Bend forward, lift the right knee and interlace all ten fingers under the right foot, thumbs together. Hold the foot so the palms cup the sole.
- Come back up to a tall spine with the knee still bent. Look at one point in front of you. If this is where you are today, stay here and breathe.
- Kick the right heel forward and straighten the right leg until it is roughly parallel to the floor. Keep the foot flexed, toes pulling back toward you.
- Bend your elbows down beside the calf, toward the floor. Round your spine, tuck your chin and bring your forehead toward your right knee.
- Breathe slowly through the nose. To come out, bend the knee, release the foot and stand on both feet. Change sides.
In a Bikram class the pose is done twice on each side, the first time longer than the second, and the teacher counts the seconds for you. At home, start with 5 slow breaths on each stage you can hold.
Benefits of Standing Head to Knee Pose
The honest version is shorter than the list on most studio posters.
- Standing leg: the quadriceps hold the knee straight while the small muscles around the ankle and foot keep you upright. Holding a one-legged stance for 30-60 seconds trains balance.
- Back of the lifted leg: straightening the leg with the foot flexed stretches the hamstrings and the calf. Our guide to hamstrings in yoga explains why those muscles resist.
- Core: the belly stays firm to keep the pelvis level while the body folds over the leg.
- Attention: you cannot balance on one leg and think about something else. That is why teachers say the pose trains concentration. It is a fair description of the experience, not a measured effect.
Claims that the pose massages the abdominal organs or regulates the thyroid are part of the Bikram tradition, and no study has tested them. We leave them out.
Who should skip or modify it
- Stop at stage 4 (knee bent, spine tall) if your standing knee bends when you kick out. A straight standing leg comes first, everything else later.
- Keep a soft standing knee if your knees hyperextend. When the knee pushes back past straight, the load goes into the back of the joint. Draw the kneecap up without pressing the knee backward.
- Use a strap around the ball of the foot, or hold the leg under the knee, if a recent hamstring strain or lower back pain makes the fold painful.
- Stand near a wall if you have balance problems, dizziness or low blood pressure. Folding forward in a heated room makes dizziness more likely.
- Pregnant: keep the knee bent, the spine tall and a hand on the wall. Skip the rounded fold.
For more on practising without injury, read our 10 tips to avoid yoga injuries.
Common mistakes
- Kicking out before the standing leg is straight. The pose then balances on a bent knee and never gets stronger. Stay at stage 4 until the leg holds.
- Pushing the standing knee backward. Straight comes from the thigh muscles, not from the joint.
- Jerking the leg straight. Kick slowly and stop where the hamstring says stop.
- Letting the hip of the lifted leg rise. Keep both hip bones level and facing forward.
- Chasing the forehead to the knee. If you have to bend the lifted knee or lose the standing leg to touch, you have gone too far.
- Looking around. Your eyes move, your balance follows. Pick one point. Our guide to drishti, the yoga gaze, has more on this.
Preparatory poses
- Adho Mukha Svanasana (Downward-Facing Dog): lengthens the hamstrings and calves.
- Padangusthasana (Big Toe Pose): a standing forward fold with both feet on the floor.
- Janu Sirsasana (Head to Knee Pose): the same fold over one leg, seated, with no balance to worry about.
- Vrksasana (Tree Pose): one-legged balance on a straight standing leg.
- Garudasana (Eagle Pose): the pose that comes right before it in the Bikram sequence, a bent-knee balance.
Follow-up poses
In the Bikram sequence, Standing Head to Knee is followed by Dandayamana Dhanurasana (Standing Bow Pulling Pose), a standing backbend on one leg, and then by Tuladandasana (Balancing Stick Pose). Later in the standing series, Standing Separate Leg Head to Knee Pose brings the forehead to the knee again, this time with both feet on the floor.
Variations
- Knee bent, spine tall: stage 4. The full pose for many practitioners for a long time.
- Leg straight, spine upright: kick out, keep the chest lifted and skip the fold.
- With a strap: loop it around the ball of the foot and hold both ends.
- Utthita Hasta Padangusthasana (Extended Hand to Big Toe Pose): the Ashtanga and Iyengar relative. You hold the big toe with one hand, the other hand on the hip, and fold with a long spine instead of a rounded one.
- Seated, as Janu Sirsasana: the same fold with no balance. Sit with the right leg straight, the left foot against the right inner thigh, turn toward the right leg and fold forward. Bend the straight leg if you need to reach the foot.
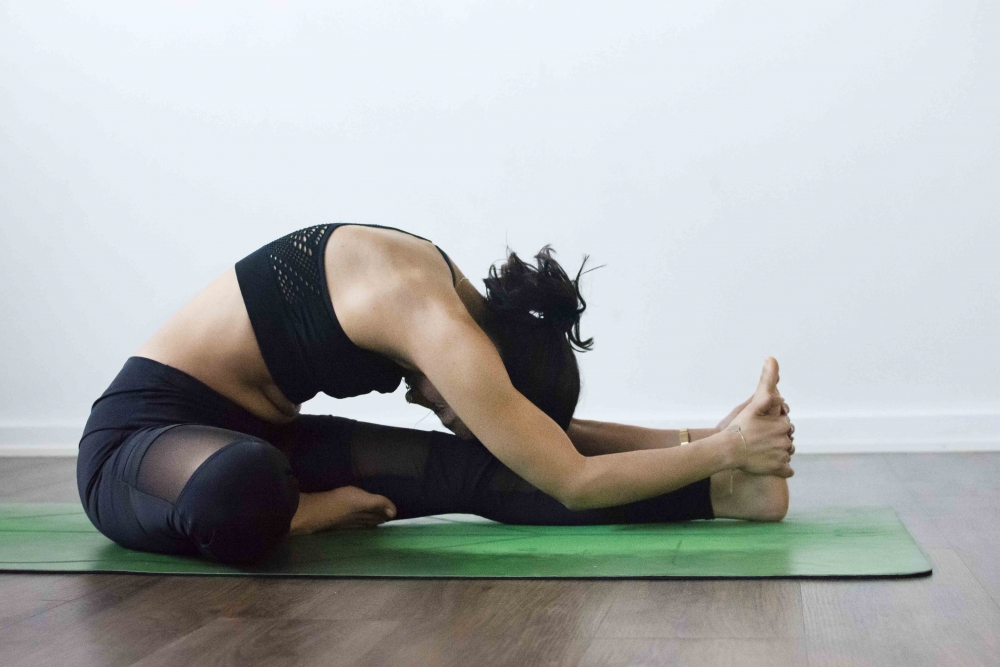
Where teachers disagree
The biggest argument is the standing knee. Bikram's own cue was to lock it, and many hot yoga teachers still say so. Teachers from other styles tell students to keep a slight bend. Both can be right. When "lock" means firming the thigh so the knee is straight and stable, it is a good cue. When it means pressing the joint backward, it loads the back of the knee, especially in people who hyperextend. The second argument is the spine. The Bikram version rounds the back to bring the forehead to the knee. Utthita Hasta Padangusthasana keeps the back long. The rounded version stretches the back as well as the legs, the long-spine version puts more of the stretch into the hamstrings. Neither is wrong.
Lauren Matters teaches this pose and the rest of the standing poses of the Bikram sequence in the class Hot 26 Standing Series, 30 minutes, level 1.
Frequently asked questions
What is Dandayamana Janushirasana in English?
Standing Head to Knee Pose. Dandayamana means standing, janu knee, shira head and asana posture. It is the fifth pose of the Bikram sequence, a one-legged balance with the lifted leg straight and the forehead folded toward the knee.
What are the benefits of head to knee pose?
The standing version trains balance and the strength of the standing leg, stretches the hamstrings and calf of the lifted leg, and asks the belly to stay firm. The seated Janu Sirsasana stretches the hamstrings and back without the balance. Claims about organs or glands have not been tested.
Is Standing Head to Knee Pose good for beginners?
Yes, if you practise it in stages. Beginners hold the foot with the knee bent and the spine tall, and work on keeping the standing leg straight. Kicking the leg out and folding forward come later, often much later.
Should you lock your knee in Standing Head to Knee Pose?
Straighten it by drawing up the thigh muscles, but do not push the knee joint backward. If your knees hyperextend, keep a slight softness in the standing knee and focus on the thigh doing the work.
How long should you hold Standing Head to Knee Pose?
In a Bikram class you do it twice on each side, the first round longer than the second, following the teacher's count. At home, 5 slow breaths per side in the stage you can hold is a good start. Come out when the standing leg starts to bend.
What is the difference between Janu Sirsasana and Standing Head to Knee Pose?
Janu Sirsasana is seated: one leg straight, the other bent with the foot against the inner thigh, folding over the straight leg. Standing Head to Knee asks for the same fold while you balance on one leg, which makes it a strength and balance pose as well as a stretch.