Sirsasana Variations - Headstand Pose
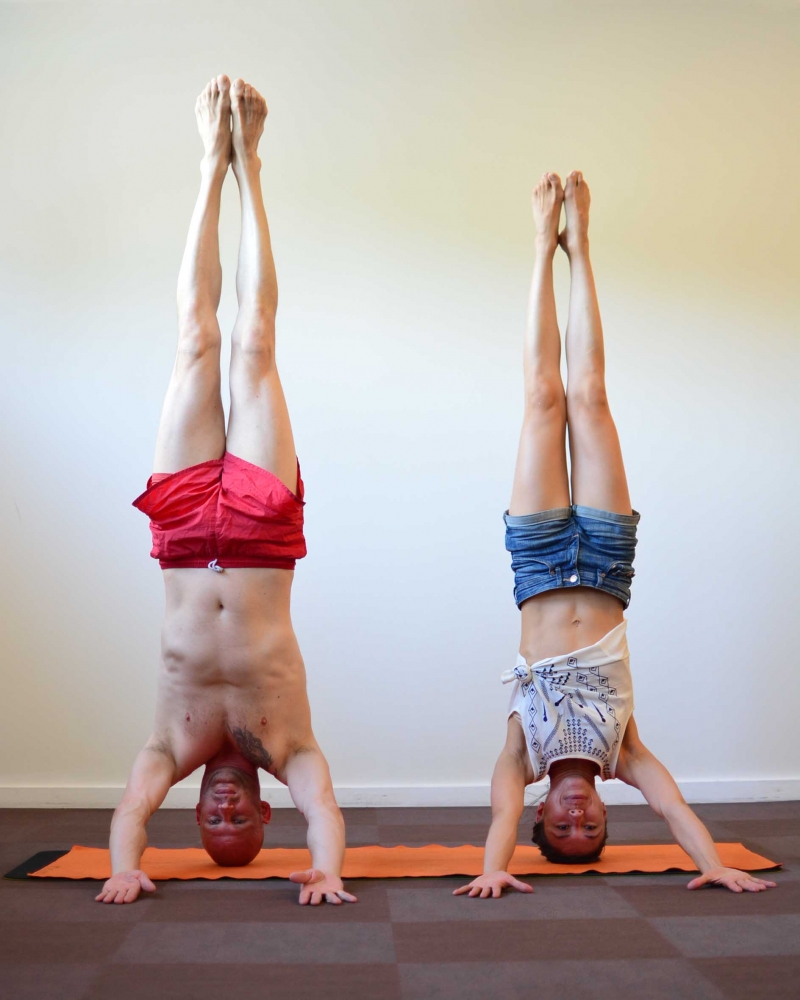
Headstand is a very tricky asana that yogis, especially beginners, should approach with caution. Performing this classic yoga pose requires you to place your forearms on the floor and clasp the hands behind your head.
When you’re stable or comfortable enough in the Sirsasana (Headstand) pose, you can now begin learning its several leg variations. This next level of practice energizes and lengthens your spine, properly preparing your body for forward bends and backbends.
Yogis practice the whole of this class in the Headstand position. So, get ready to invert and move through a very detailed sequence that focuses on Eka Pada and Parivrtta Eka Pada Sirsasana. The emphasis here is on alignment and precision.
Salamba Sirsasana I - Supported Headstand
This is a variation of the traditional Headstand (Sirsasana). The inversion shows control, strength, and beauty. The name Salamba Sirsasana I comes from the Sanskrit words Salamba which means “with support,” Sirsa which means “head,” and asana which means “posture.” In English, this pose is also called Supported Headstand.

To enter the asana:
Begin in the Ardha Pincha Mayurasana (also called the Dolphin Pose), then bring your palms to touch and interlace your fingers.
Rest the crown of your head on the mat between your arms.
Slowly move your knees closer to your torso.
Shift your body’s weight from the feet to your arms as your torso is vertically aligned.
Hug one knee toward your chest and see if you can lift your toes on the extended leg, then repeat on the other side. Don't jump, work on control instead.
Salamba Sirsasana I acts as a building block towards reaching the complete expression of the Sirsasana inversion. The Supported Headstand has the following benefits:
Returns blood to your heart and brain, thereby refreshing your cardiovascular and lymphatic systems.
It also has energizing effects on your entire body.
It helps relieve asthma and manage asthmatic symptoms.
Provides mental clarity and renewed energy
It can also help increase concentration and memory over time.
It can help redirect your sexual energy to a higher spiritual utilization if you’re doing it for religious purposes. This can promote a positive atmosphere around you and increase wellness. This energy is known as Ojas, and it can help heighten other spiritual yogic practices.
Just like other inversions, Salamba Sirsasana can help open your Ajna (third-eye chakra). The reverse body position allows energy to flow to this third-eye, increasing intuition, psychic ability, and spirituality.

Salamba Sirsasana II - Tripod Headstand
Also called the Sirsasana B or Mukta Hasta Sirsasana in the Sanskrit, the Tripod Headstand is a variation of Sirsasana (traditional Headstand). A “royalty” of yoga poses, just like other Headstands, Salamba Sirsasana II is an inversion that shows control, strength, and charm. It is a building block towards reaching the complete expression of Sirsasana.
Many treat the Tripod Headstand as a more advanced version of Sirsasana, but that’s not always the case. Some people who can’t make sense of Sirsasana I easily feel cozier with Sirsasana II. This is probably because it more closely parallels the Headstands they performed as children.
However, it is recommended that you master the Tripod before progressing to the full Headstand. If you set it up properly with good alignment, you’ll have no reason for not trying it before mastering the complete version. Whichever the case, ensure that you increase your strength and control when lifting into the full asana.

Follow these instructions for this pose:
Begin on all fours.
Place your head’s crown on the mat between a bit forward than your hands, think about a tripod, you want to create three points of contact; your head and two hands.
Shift your body’s weight from your feet to your arms and head, making sure to keep your elbows at an angle of 90 degrees. The palms should remain on the ground with your arms and head forming an equilateral triangle to act as an underpinning (“tripod”) base.
Transfer your weight forward toward the head and hands in order to lift one foot off the floor.
Hug one knee toward your chest and see if you can lift your toes on the extended leg, then repeat on the other side.
Once the legs are up, maintain this position for at least five breaths, ensuring you’re pressing strongly into your palms for the entire period of time.
To come out, slowly lower your feet back to the mat, ensuring that you engage the core to get a controlled descent.
The Tripod Headstand has the following benefits:
It returns blood to your heart and brain, thereby refreshing your lymphatic and cardiovascular systems
It energizes your body
Can help relieve headaches
Stimulates the pituitary glands
Can increase mental clarity, memory, and concentration due to increased blood flow to the brain
Salamba Sirsasana III - Supported Headstand
This is a variation of the master Sirsasana pose that requires stability with your head’s crown and shoulders’ strength. The base asana balances your body on the head’s crown while supporting your head with your cupped hands. Contrarily, this supported headstand pose uses your palms as support when you place them on the floor.
Salamba Sirsasana offers the following benefits:
Helps to open, activate, and balance the crown and third eye chakras
Strengthens and stretches the muscles of the arms, shoulders, core, and neck
Follow the following instructions carefully to perform this pose:
Begin on all fours.
Now place your head’s crown on the ground, slowly moving your hips and going onto the toes in the Tripod Dolphin Pose
Bring your palms on the ground while the fingers are pointing towards your face’s direction, outwards.
Exhale. Raise your right leg, slowly putting your right knee over your right upper arm, while curving your right leg in Tripod Headstand Prep One Knee On Elbow
Inhale. Bring your right knee to rest on your right upper arm in Tripod Headstand Prep Knees On Elbow. Adjust your hips and legs to a comfortable position.
Inhale and lift your right leg, completely stretching it in Tripod Headstand Prep One Leg Half Raised
Inhale and bring your other leg to completely stretch it in Tripod Headstand Sequence Flow
Slowly move your right palm and turn it while bringing the fingers to face the opposite direction. Do the same with the other palm
Adjust your body slowly, avoiding to move your head and you’ll come to Sirsasana III
To release, bend your right leg and put your toes on the ground. Then, bring your left leg and put your toes on the ground, while shifting your arms for comfort
It is not easy to master the Sirsasana III pose. You require strong shoulder, neck, and core muscles to do this. Although flexibility is important, strength and balance play a greater role here. Therefore, you need to do the following preparatory yoga poses before practicing this asana:
Forearm side Plank and Camatkarasana for arm and shoulder muscle strength
Sarvangasana and Chakrasana for shoulder and neck muscle strength
Dekasana and Urdhva Mukha Paschimottasana for core muscle strength and balance
Sirsasana (Headstand Pose)
Niralamba Sirsasana
Also called the Unsupported Headstand, Niralamba Sirsasana is a variation of the classical Headstand Pose. However, it is harder to perform it than its base asana since you’ll be attempting to balance your entire body weight only on your head in an inverted position. You only use your arms to offer a sense of balance but not to bear the load.
Niralamba Sirsasana comes from the Sanskrit’s four words. Nira means “without,” Lamba means “support,” Sirsa means “head,” and asana means “pose” or “posture.” The translation of Niralamba Sirsasana into English is Unsupported Headstand.
Niralamba Sirsasana has many variations depending on how you position your arms in relation to the body. Sometimes, you can keep them on the sides while at others, they’re in front of your body on the ground. Overall, it’s your head and neck muscles that primarily support your body weight. Again, your arms are just for achieving balance in the inverted posture.
It is advisable to master the Salamba Sirsasana before trying to perform Niralamba Sirsasana. The steps for doing the Unsupported Headstand are similar to the Supported Headstand from the beginning. However, in the end, you’ll move your hands to a position where it’s only the head that supports your body weight.

Practice this transition with great caution:
Slowly move your hands to the front of your body on the ground so it can help in balancing. Ensure they don’t support any weight.
If you’re an advanced practitioner, remove your hands from the ground and place them next to your legs or thighs. If you’re in your initial stages, you can use a wall to support yourself and get a partner to help prevent any fall.
If you’re a beginner, stay in the final position just for a few seconds. You can increase the time as your skills and ability gets better
To release, bring your hands back to the floor, next to your head just like in Salamba Sirsasana.
Slowly descend, coming back to the initial Marjariasana position.
You can do Tadasana (optional) to help in bringing back excess blood from your head to the body.
Lie down in the Shavasana position for a short time to rest
Niralamba Sirsasana offers the following benefits:
Connects you with higher spiritual energy
Stimulates health and vitality
Calms your mind and relieves stress
Boosts mental clarity
Purifies the blood
Relieves asthma symptoms
It can help relieve headaches
Tones the pituitary glands
How to Safely Practice Headstand
Headstand can be a terrific asana for your mind and body. Practicing it has lots of benefits. However, you must exercise it with a lot of caution to avoid cervical spine injury. The risk of harm heightens when you practice headstand with poor techniques and alignment or over-repetition.
You shouldn’t take the risks of practicing this asana lightly. Here are some suggestions to keep you safe when considering to perform the Headstand position:
Skip the asana if you have any injury, especially on your neck, shoulder, and upper back. The risks of Headstand position injuries far outweigh its benefits if you have an existing medical problem or condition. If you have an inflammation, misalignment, or weakness, consult your physician before trying to enter this pose.
Since Headstand is an advanced pose, you’ll require the services of a qualified and experienced instructor to learn it without risking your health. A seasoned teacher is able to tell whether you possess enough strength to support your body and can advise on various technicalities such as alignment. Online yoga videos are good, but may not be safe for such an advanced pose.
It is important to start practicing the Supported Headstand position first before trying the full pose and its other variations.
Enter the pose by lifting your straightened legs simultaneously. Do it slowly to limit the amount of cervical flexion and achieve moderate weight loading. If you have a lower back issue, then this variation may be a bit problematic. An alternative is to raise both knees into your chest to come into a tuck position. Then, straighten the legs.
You can learn the Headstand position against a wall for increased safety as it avoids toppling out of the pose. However, you should resist the temptation of kicking up to it. Instead, bring your legs or knees into your chest first. If you kick up to the wall, you’ll get into a backbend. This way, you may collapse into the lower back, making it more difficult for the core to get back to the upright position. Additionally, you risk over-flexing or hyper-extending your neck, thereby bringing it out of neutral alignment.
Exit the Headstand slowly, symmetrically, and with good control.


