Setu Bandha Sarvangasana (Bridge Pose): How to Do It Step by Step

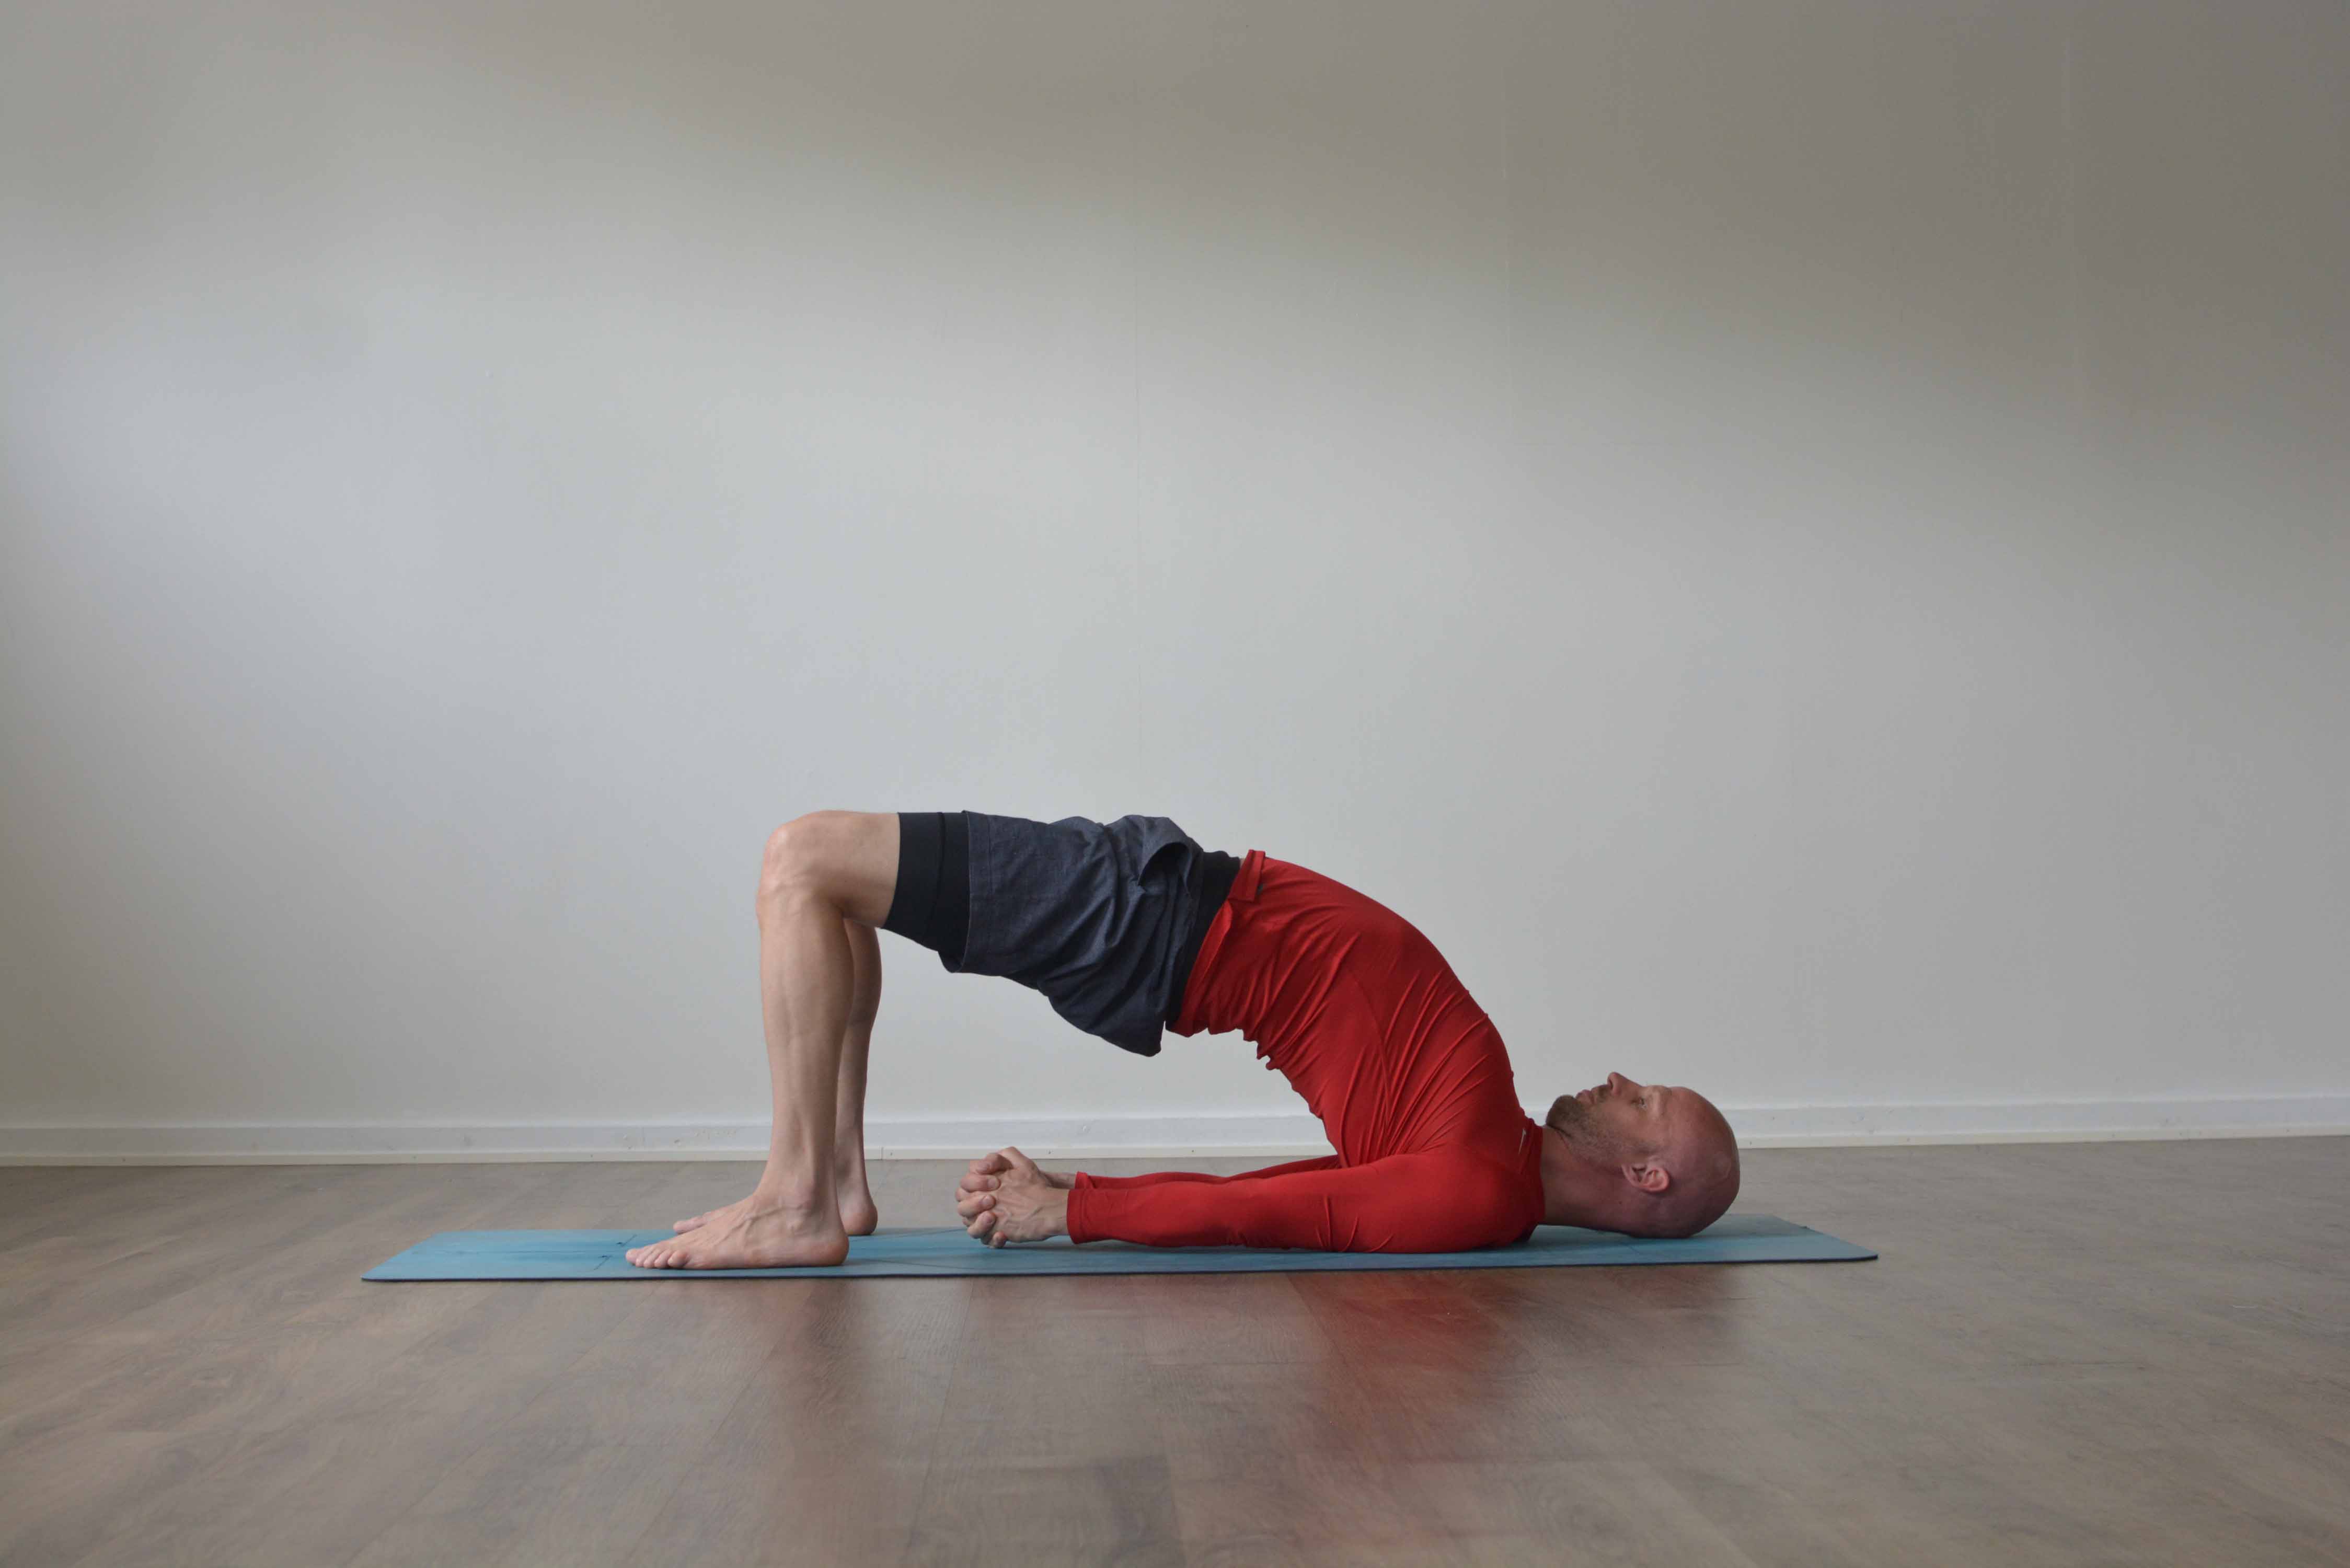
Setu Bandha Sarvangasana (Bridge Pose) is a backbend done lying on your back: the feet stay on the floor, the hips lift, and the body makes a bridge from the shoulders to the knees. It works the glutes and the backs of the legs while it opens the front of the hips and the chest. Most beginners can do a low Bridge in their first class, which makes it one of the usual first backbends.
Pose type: supine backbend, strength for the back of the body. Level: beginner, with harder variations. Props: a folded blanket under the shoulders, a block for the supported version.
What Setu Bandha Sarvangasana means
The name has four Sanskrit parts. Setu means bridge. Bandha means lock or binding. Sarvanga is sarva, all, plus anga, limb, so "the whole body". Asana means seat or posture. Put together: the bridge-building pose of the whole body. Sarvangasana on its own is the name of Shoulderstand, and the full name tells you where the pose came from (more on that below).
You will also see Setu Bandhasana, the short form most classes use, and Kandharasana, shoulder pose, the name in the Satyananda tradition. Dvi Pada Pitham, two-footed table, is the name in the Viniyoga tradition of T.K.V. Desikachar, where the hips lift and lower with the breath instead of holding still.
How to do Bridge Pose, step by step
- Lie on your back. If your neck is sensitive, fold a blanket and lie with your shoulders on it and your head on the floor, so the neck has room.
- Bend your knees and set your feet on the floor, hip-width apart and parallel. Walk the heels in until your fingertips can brush them.
- Lay your arms along your sides, palms down. Look straight up and keep your head still for the whole pose.
- Breathe in. As you breathe out, press down through your feet and upper arms and lift your hips. Peel the spine off the floor from the tailbone up.
- Lift until the thighs are close to parallel with the floor. Keep the knees over the ankles and point them forward. Picture a block between your thighs, so the knees do not fall apart.
- Roll one shoulder under, then the other. You can clasp your hands under your back and press the arms into the floor, or keep the palms flat.
- Draw the top of the breastbone toward the chin, and keep space between the chin and the chest. The back of the neck stays long.
- Stay for 5-10 breaths, 30 seconds to a minute. To come down, release the hands and roll the spine back to the floor from the upper back to the tailbone. Rest, then repeat two or three times.
Where you feel it tells you what is working. A warm, busy feeling in the buttocks and the backs of the thighs is right. If the lower back pinches, bring your hips down a little and lengthen the tailbone toward the knees.
The Light on Yoga version
The name makes sense once you see the older form. In Light on Yoga (1966), B.K.S. Iyengar teaches Setu Bandha Sarvangasana as a move out of Shoulderstand: the hands support the back, and the legs lower to the floor behind you until the body arches from the shoulders to the feet, with the legs straight. It is a strong, advanced backbend. The bent-knee Bridge most classes teach today is the gentle cousin of that pose, and it has become the main one.
Benefits of Bridge Pose
Bridge is a hip extension held under load. That is what it does, and most of its benefits follow from that.
- Glutes and hamstrings: they do the lifting. The glute bridge exercise used in physiotherapy and strength training is the same movement, and studies of it show strong work in the gluteus maximus. Our post on glutes and yoga explains why these muscles matter for the rest of your practice.
- Front of the hips: it stretches the hip flexors, which get short from long days in a chair. Read more about the hip flexors and psoas in yoga.
- Chest and shoulders: rolling the shoulders under and pressing the arms down opens the front of the chest and the shoulders.
- Spine: it takes the upper and middle back into extension, the opposite of the rounded shape we sit in.
Bridge exercises are also a common part of exercise programmes for people with lower back pain. That is support for the strength work, not proof that Bridge fixes a back. The supported version, with a block under the sacrum, is a quiet pose where the breath slows by itself, and it is used in restorative yoga. Older lists credited Bridge with curing asthma, sinusitis, high blood pressure and thyroid problems. No study supports that, and we left it out.
Who should skip or modify Bridge Pose
In Bridge your weight rests on the shoulders and the back of the head, with the neck bent forward. That is where the risk sits.
- Neck injury or neck pain: use a blanket under the shoulders, stay low, or choose the supported version on a block. Skip it if it hurts.
- Never turn your head to look around the room while you are up. Your neck is carrying weight.
- Knee pain: move the feet a little further from the hips so the knees bend less.
- Lower back pain: stay low and focus on the glutes. Pain that gets sharper is a sign to come down.
- Pregnancy: many teachers and midwives advise against lying flat on the back for long after the first trimester. Short, low Bridges with a block often work. Check with your midwife, and see our prenatal yoga program.
For more on practising without injury, read our 10 tips to avoid yoga injuries.
Common mistakes
- Knees falling out to the sides. The glutes stop working and the lower back takes over. Squeeze a block between the thighs.
- Feet turning out. Keep the outer edges of the feet parallel.
- Lifting from the belly instead of the hips. The ribs flare and the lower back arches hard. Press through the heels and keep the front ribs soft.
- Pushing the chin into the chest. Keep a fist's width of space under the chin.
- Pulling the shoulders away from the ears by force. This overstretches the back of the neck. Broaden the shoulder blades instead.
- Dropping down in one go. Roll down slowly, one part of the spine at a time.
Preparatory poses
Bridge asks for open hip flexors, open shoulders and awake glutes. These poses prepare all three:
- Bhujangasana (Cobra Pose): a gentle backbend that teaches the spine to extend.
- Salabhasana (Locust Pose): strength for the whole back of the body.
- Supta Vajrasana (Fixed Firm Pose): a deep stretch for the thighs and the front of the hips. Go easy if your knees complain.
- A low lunge: the simplest way to stretch the hip flexors before you lift.
Follow-up poses
- Urdhva Dhanurasana (Wheel Pose): the next step once Bridge is steady, with the hands on the floor beside the head.
- Salamba Sarvangasana (Shoulderstand): the pose Bridge takes its name from, often done after it in the same sequence.
- Matsyasana (Fish Pose): the counterpose to Shoulderstand, and another chest opener lying on your back.
- Pavanamuktasana (Wind-Removing Pose): hug the knees to the chest after your last Bridge to round the lower back again.
End the sequence in Savasana (Corpse Pose).
Bridge Pose variations
- Supported Bridge: lift the hips and slide a block under the sacrum, the flat bone at the base of the spine. Rest there for a few minutes. Our class Lean Back and Relax is 20 minutes of supported backbends on blocks.
- Dvi Pada Pitham: lift the hips as you breathe in and lower them as you breathe out, 6-8 rounds. A good warm-up and a good way to learn the pose.
- Eka Pada Setu Bandha Sarvangasana (One-Legged Bridge): from Bridge, lift one leg straight toward the ceiling. Keep the hips level. The standing leg works much harder.
- Hands on heels: hold the heels or the ankles instead of clasping the hands, for more lift in the chest.
- Bridge with Mula Bandha: some teachers cue the root lock in Bridge. Our guide to Mula Bandha explains what that means.
Lizette Pompa's class Open Your Back is a 15-minute Hatha backbend class with two blocks: you move into Bridge Pose, then on to Wheel if you want the challenge.
Frequently asked questions
What is Bridge Pose good for?
Bridge Pose strengthens the glutes and hamstrings, stretches the front of the hips and the chest, and takes the spine into a gentle backbend. It is a common first backbend and a common exercise in back pain programmes. The supported version on a block is used as a restful pose.
How do you do Bridge Pose correctly?
Lie on your back with your knees bent and your feet hip-width apart, close to the hips. Press through the feet and arms and lift the hips until the thighs are close to parallel with the floor. Keep the knees pointing forward, the head still and space under the chin.
How long should I hold Bridge Pose?
Hold it for 5-10 breaths, about 30 seconds to a minute, then roll down and repeat two or three times. The supported version on a block can be held for several minutes.
Who should not do Bridge Pose?
People with a neck injury or neck pain should modify it or skip it, because the neck bends forward under weight. Take care with knee or lower back pain, and ask your midwife about lying on your back if you are pregnant after the first trimester.
What is the difference between Setu Bandha Sarvangasana and Setu Bandhasana?
In most classes today they are the same pose: the bent-knee Bridge. Setu Bandhasana is the short name. In Light on Yoga, Setu Bandha Sarvangasana is an advanced form entered from Shoulderstand with the legs straight.
Is Bridge Pose a beginner pose?
Yes. A low Bridge with the arms by your sides suits most beginners. It gets harder as you lift higher, clasp the hands, lift one leg or move toward Wheel Pose.